RARE! WWII 1943 "LANGEMAK BAY" Huon Peninsula New Guinea Campaign 8th Photo Squadron 5th Air Force Combat Map


RARE! WWII 1943 "LANGEMAK BAY" Huon Peninsula New Guinea Campaign 8th Photo Squadron 5th Air Force Combat Map
Comes with a hand-signed C.O.A.
“The Australians received reinforcements the next day with a squadron of Matilda tanks from the 1st Tank Battalion arriving by landing craft at Langemak Bay amidst tight security that was aimed at keeping their arrival secret from the Japanese. Accompanying the tanks was the 26th Brigade; its arrival meant that the 9th Division had now been committed in its entirety.”
This rare and museum-grade WWII Pacific Theater combat operations map was used during the infamous New Guinea Campaign (1942-1945). New Guinea was an important strategic island to both the Allied and Japanese Imperial Forces during World War II. Located east of Indonesia and just north of Australia, between the Coral Sea and the South Pacific Ocean, New Guinea is the second-largest island in the world. For the Americans, New Guinea served as a strategic point in the second stage of their offensive against the Japanese at Rabaul on the southwest Pacific Island of New Britain.
The New Guinea offensives were the single largest series of connected operations Australia and Allied forces in the Pacific have ever mounted. While the supreme command was, of course, American, and while the campaign depended upon American air and naval support, the New Guinea battles were Australia’s own. They involved tens of thousands of troops, both in combatant units and in the massive logistic infrastructure that jungle warfare demanded. From 1942 to August 1945, New Guinea was the location of some of the most infamous land, air, and naval battles in the Pacific Theater. It was here where US, Australian, British, and Netherlands soldiers fought against the Empire of Japanese. From 1942 to 1945 it is estimated that nearly 42,000 total Allied soldiers were KIA and 202,100 were KIA for Japan (127,600 on New Guinea's main island, 44,000 on Bougainville, 30,500 on New Britain, New Ireland, and the Admiralty Island).
Titled “LANGEMAK BAY - NEW GUINEA” this combat map is a rare “1943 print created using aerial recon photos from the U.S. 8th Photo Squadron, 5th Air Force.
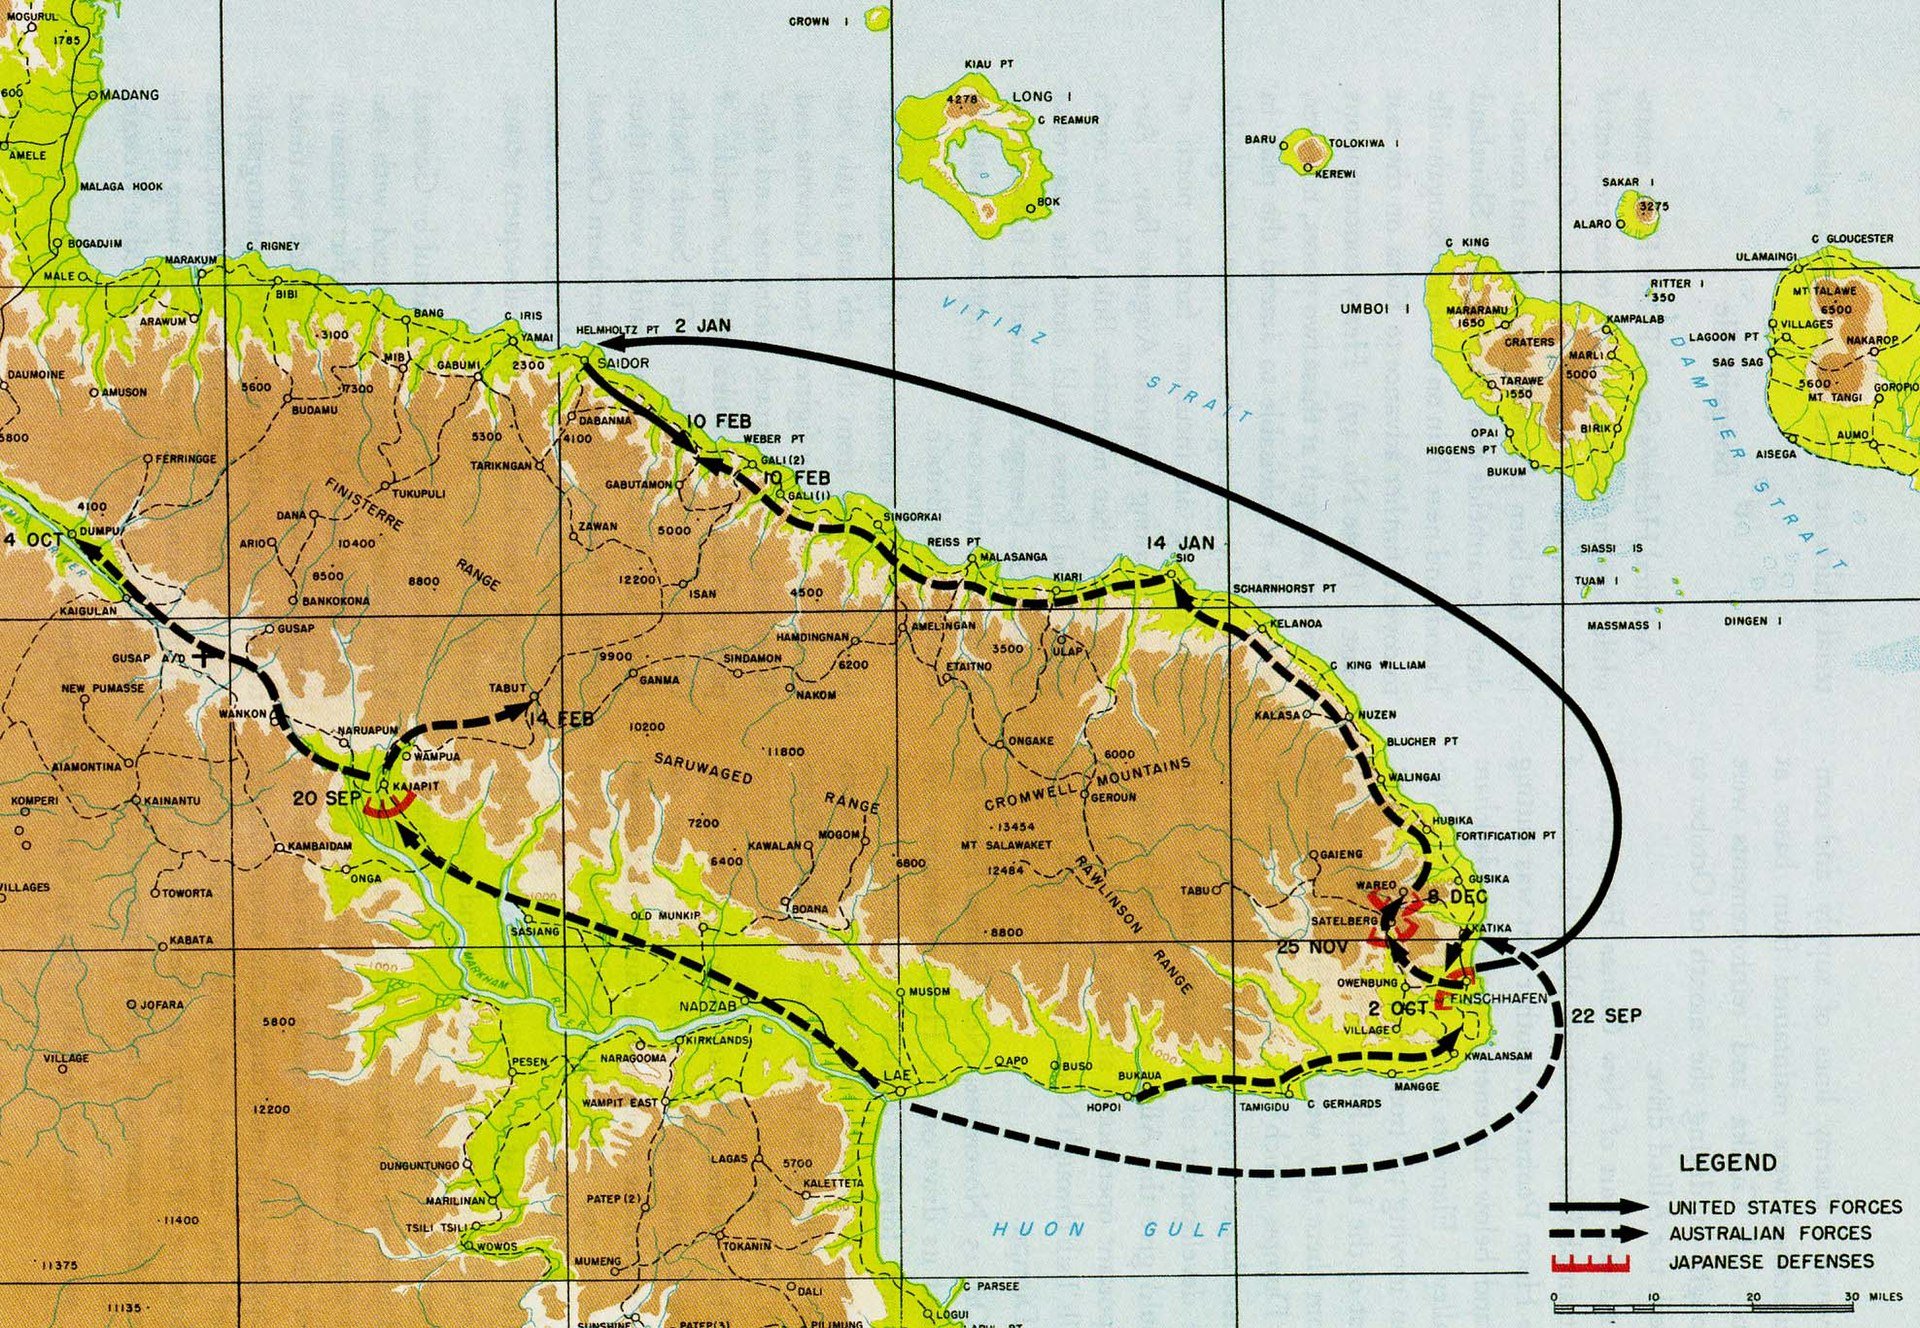
This incredibly rare and museum-grade WWII combat map was used during the Huon Peninsula campaign (New Guinea). The Huon Peninsula campaign was a series of battles fought in north-eastern Papua New Guinea in 1943–1944 during the Second World War. The campaign formed the initial part of an offensive that the Allies launched in the Pacific in late 1943 and resulted in the Japanese being pushed north from Lae to Sio on the northern coast of New Guinea over the course of a four-month period. For the Australians, a significant advantage was gained through the technological edge that Allied industry had achieved over the Japanese by this phase of the war, while the Japanese were hampered by a lack of supplies and reinforcements due to Allied interdiction efforts at sea and in the air.
The campaign was preceded by an amphibious landing by troops from the Australian 9th Division east of Lae on 4 September 1943. This was followed by an advance west along the coast towards the town where they were to link up with 7th Division advancing from Nadzab. Meanwhile, Australian and US forces mounted diversionary attacks around Salamaua. Heavy rain and flooding slowed the 9th Division's advance, which had to cross several rivers along the way. The Japanese rear guard also put up a stiff defence and, as a result, Lae did not fall until 16 September, when troops from the 7th Division entered it ahead of the 9th, and the main body of the Japanese force escaped north. Less than a week later, the Huon Peninsula campaign was opened as the Australians undertook another amphibious landing further east, aimed at capturing Finschhafen.
Following the landing at Scarlet Beach, the Allies set about moving south to secure Finschhafen, which saw fighting around Jivevaneng also. In mid-October, the Japanese launched a counterattack against the Australian beachhead around Scarlet Beach, which lasted for about a week and resulted in a small contraction of the Australian lines and a splitting of their force before it was defeated. After this, the Australians regained the initiative and began to pursue the Japanese who withdrew inland towards the high ground around Sattelberg. Amidst heavy fighting and a second failed Japanese counterattack, Sattelberg was secured in late November and the Australians began an area advance to the north to secure a line between Wareo and Gusika. This was completed by early December, and was followed by an advance by Australian forces along the coast through Lakona to Fortification Point, overcoming strong Japanese forces fighting delaying actions.
The final stage of the campaign saw the Japanese resistance finally break. A swift advance by the Australians along the northern coast of the peninsula followed and in January 1944 they captured Sio. At the same time, the Americans landed at Saidor. After this, mopping up operations were undertaken by Allied forces around Sio until March and Madang was captured in April. A lull period then followed in northern New Guinea until July when US forces clashed with the Japanese around the Driniumor River. This was followed by further fighting in November 1944 when the Australians opened a fresh campaign in Aitape–Wewak.
The amount of intelligence that went into producing this specific combat operations map was very intensive which makes this a very valuable map used during the battles.